DevLog 34: Homing Missiles And The Math Behind It
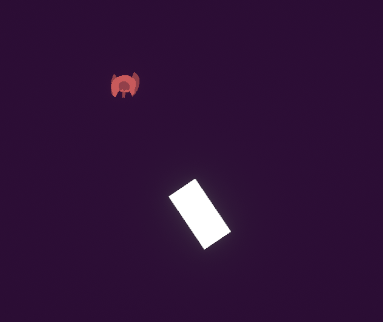
Today I added a new homing missile power up to my game. Its a permanent power that has a chance to activate when the player deals damage. Once activated, a homing missile will shoot out from the player and target what the player is attacking then seek nearby enemies. This power up is stackable and will shoot more missiles per homing missile power up obtained.
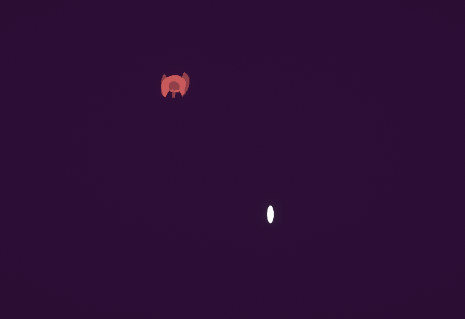
The power up can be activated from both the player and Super K (that little rocket thing in front)
How it works ( code wise )
Ill begin with how the missile is instantiated and how I handled the ,’ chance ‘ to activate works. Then moving onto something a bit more complicated like how the missiles find and follow their targets.
PlayerScript — Rolling ( Chance to Activate )

I have a region in my player script called ,’ Abilities’. These four functions handles whether the missiles can be fired or not.
PlayerScript-Targeting()

There’s nothing special about this function, it has a game object parameter that is then passed to a private game object variable. This function is public because every player projectile that lands a hit on a target passes its collider to this function. This will be called externally from the player projectile script which is attached to every projectile shot by the player.
Player Projectile Script — Damage()

This is the damage script within my players projectile script. Its called when the laser has collided with a game object that has entered its trigger.

The collided game object is passed to this function and then passed into the player script Targeting() function.
PlayerScript-RollDice()

_roll is a private int within the player script. whenever this function is executed, it’ll assign _roll with a random value between 0–100. Then call HomeShotrefill().

You may or may not have noticed it, but the RollDice() function is also called within the same Damage() function in the player projectile script. So when the player shoots and lands a shot, it’ll roll between a number of 0–100 and assign an initial target to follow.
PlayerScript-HomeShotrefill()
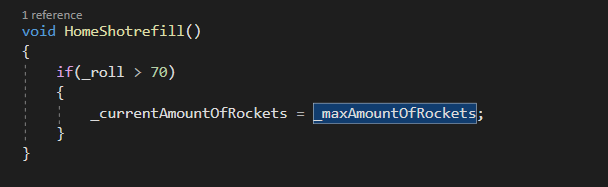
Finally, in the step before the last, we check if the roll was higher than 70. If so then we check if the player has received a power up.
A easy solution to this is to have _maxAmountofRockets increment whenever the player has picked up a homing missile power up.
Then using another variable ,’_currentAmountOfRockets’ to decrement every time a missile is shot. In doing so, only firing out the amount of missiles the player has picked up.
This function ,’Loads’ the rockets in, but doesn't fire them. Thus, ‘HomeShotrefill().
PlayerScript-Recap
The player shoots > Laser Hits > Rolls number between 0–100 > Assigns initial Target > Loads missiles.
Firing The Homing Missiles!
Finally, in Update, I have the Homing shot function checked every update to see if all conditions are met to fire a homing missile.

Within HomingShot() we check if the player has the homing shot power up and if its been ,‘loaded in’ by the homeshotrefil(). I then have a timer that makes it so there's a delay in firing missiles. If all conditions are met, the player will automatically fire a homing missile.
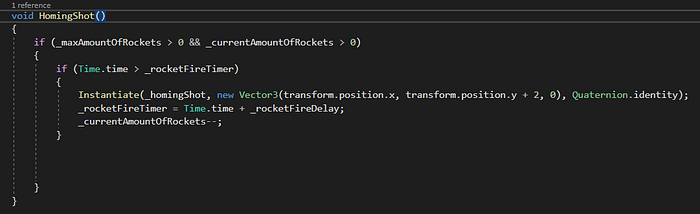
Initially had this in loops, but ran into a issue where the number of rockets expanded during a loop and caused a error.
HomingShotScript
I’ve created a script specifically for the homing missile that will be placed on the game object.

Initial Target
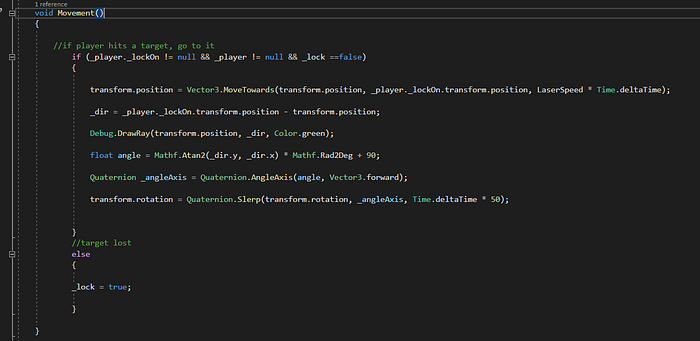
The missile will initially lock on to the same target that the player is damaging. If the target is dead, a bool named _lock will ,’lock’ the missile out of this conditional statement so that it can begin finding its own target via Retarget().

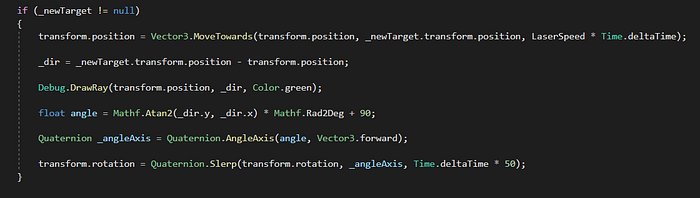
The missile will simply move towards its target by using the Vector3.MoveTowards. Populating it with its own transform, the players target ( _player._lockOn.tranform.position ), Its speed multiplied by time.deltaTime.
However, getting the missile to turn and face towards the enemy is a bit more complicated.
Calculating the angle using Tangent

To get the angle needed to face towards our target, we need to use a bit of trigonometry.
To find the angle, we need to understand that the Bullet and enemy is plotted on a X,Y,Z coordinate.
The bullet at (5,-10 )
The enemy at (-10,10)

We first get the direction by subtracting the enemy’s position by the projectiles position.
or (-10,10) — (5,-10)
= (-15,20)
We could check this, by counting this from (5,-10) on the graph. It checks out. Going -15 on the X brings us to -10 and 20 on the Y goes to 10.
(-10,10) <- where the enemy is.

Our new direction is (-15,20)
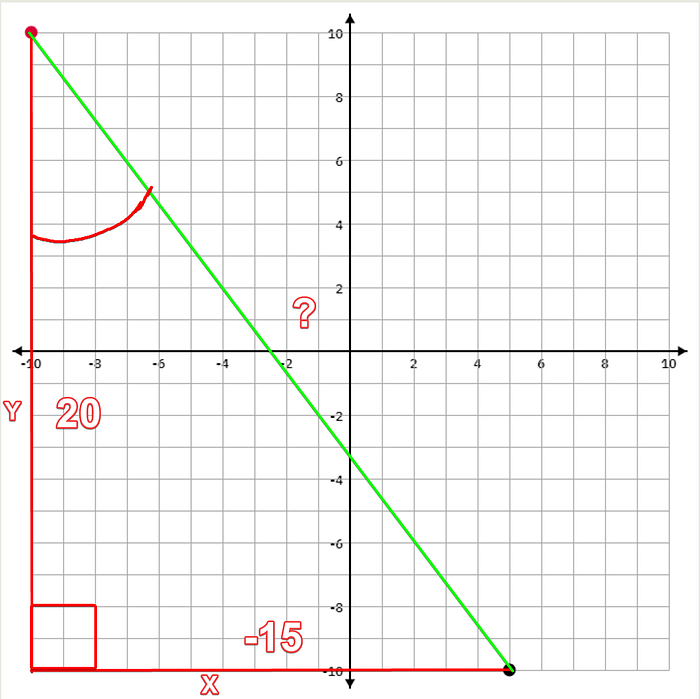
We have the X and Y, but don't have what we need. The line (Green) that points directly at the enemy; the hypotenuse. Since we have both our X and Y or the adjacent and opposite, we know that we need to us a tangent.
Tangent is the opposite over the adjacent; so -15/20. Which equals -1.5
So, Tan (Theta) = -20Y / -15X = -1.5
We can plug in our new solution using inverse tangent to get the angle. No need to do it all by hand, could simply find a tan-1 calculator online.
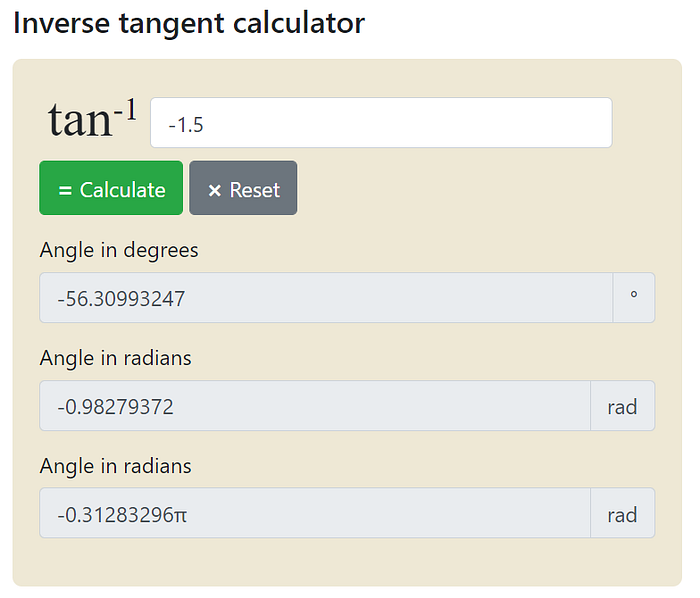
We get -56.3099327 in degrees. If we were to plug that value in the Z rotation in unity. This is how It would look.
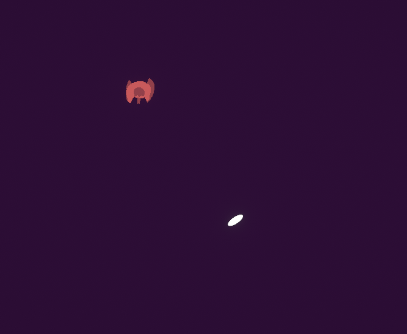
Its off, and its not because the math is wrong, its because of the objects facing direction prior to the change.
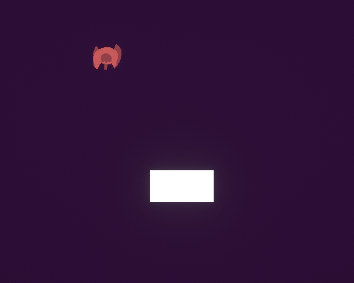
Zero degrees begins on the X axis ( Horizontal ). So my bullet was already 90 degrees facing up due to it being illustrated in that direction. If I were to apply the same -56 value to this rectangle. this is the outcome.
Points Straight at the enemy. So keep in mind of the initial objects facing direction. Now, enough math, lets bring this to code.
Converting Math Into Code
We already have our direction.
(-10,10) — (5,-10) =(-15,20)
Tan (Theta) = -20Y / -15X = -1.5

The player will shoot something with a regular shot. on successful roll, pass the enemy that is being damaged to _player.lockOn. _player.lockOn will then be subtracted by the newly instantiated Homing bullet’s position.
To calculate the angle in code. we need to utilize mathf.Atan2. mathf.Atan2 is a function in unity that handles all the steps needed to calculate the angle of our object. Its the function for inverse tangent.

Here, we plug in the direction ( _dir ) X and Y into Mathf.Atan2(X,Y). The function will then do what was calculated above, all the way down to the inverse tangent. However, it’ll return the radians not the degrees.
We use Atan2 instead of Atan1 because Atan2 can distinguish which direction an angle is going in. Atan1 gets can get a little funky and loses direction; making some numbers negative in degrees that are positive. The numbers tend to change depending on the context of the numbers.

To convert our radians, We multiply mathf.Atan2(X,Y) by Math.Rad2Deg. Multiplying the two will yield the angle that we can then assign to our rotation.
Note: the + 90 is a hard coded offset specifically for my sprite. My sprite was drawn facing up so it needed a 90 degree offset to ,’Zero’ its rotation.

Now to begin rotating.
Unity handles rotations using quaternions. So we declare a new quaternion variable and use the Quaternion. AngleAxis().Quaternion. AngleAxis() has two parameters; the Angle to rotate in, and the axis to rotate in.
in this case, we plug in ,’angle’ and Vector3.forward. Vector3.forward will rotate our object in the Z axis.

I assign the missile’s rotation with Quaternion.Slerp because allows us to have more control over the speed of which the object will rotate towards its target .
Quaterion.Slerp takes three paraments, a Quaternion A , Quaternion B, and a float variable to handle rotation speed.
A is the rotation to change and B is the rotation to turn to.

This concludes how the targeting system works for this missile.
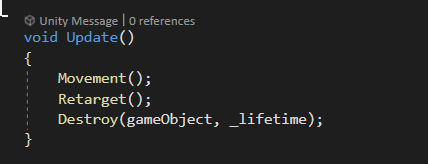
The Movement function will be called every update alongside its retargeting function.
Retargeting
Its often that the missiles will not reach its target since the target is often slain by a regular laser before it can reach it. In this case,

This conditional statement within Movement will execute not execute and will jump its else.
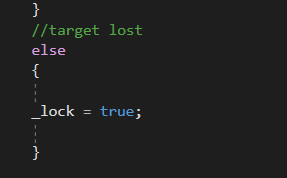
within else, a boolean named _lock will equal true which will indefinitely ,’lock’ the missile to the if statement above. Making it so that it’ll never be sent to another target a player is shooting, instead it’ll find its own target.
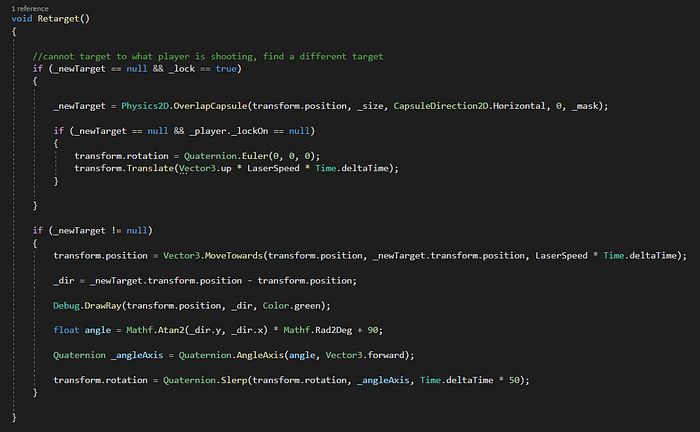
Retarget() uses a new Gameobject variable called ,’_newTarget’. as stated in the name, _newTarget will be the new target that the missile will rotate towards.
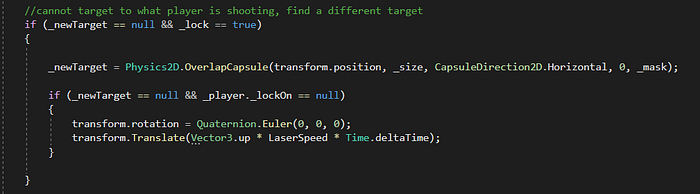
The first conditional statement in this function if _newtarget is empty and the missile is ,’locked’ out.

If all conditions are met, _newtarget will be assigned a Physics2D.OverLapCapsule. What Physics2D.OverLapCapsule will do is blink a invisible physics circle over the game object and detect any colliders within its bounds.
Physics2D.OverLapCapsule takes four parameters. A position to where to start, How big the circle is in Vector2, the direction of the sides to extend to, an angle, and a mask).

For my mask, I created a new _mask variable and assigned it a layer mask called enemy within Awake(). Pluggin this into Physics2D.OverLapCapsule makes it so that It’ll only detect objects with layer masks Enemy assigned to it.
If Physics2D.OverLapCapsule has captured an object. It’ll do the same exact thing that was done in the Movement() function but instead of the players target, its whatever was captured in Physics2D.OverLapCapsule.

If it fails, then the missile will have its rotation set back to zero and continue moving up with blinking a physics circle around it.
